Comment bien se préparer pour l'achat des billets BlizzCon 2014 ?
La nuit dernière, Blizzard a mis en ligne un guide d'achat pour les billets de la BlizzCon 2014, que je vous propose de retrouver ci-dessous. Celui-ci est uniquement disponible en anglais pour le moment mais nul doute que si vous envisagez d'y aller, ce n'est pas quelque phrases de la langue de Shakespeare qui vont vous rebuter ;)
BlizzCon 2014 ticket sales are almost here! We wanted to provide a quick walkthrough of how to purchase tickets so you’ll know what to expect and what information you’ll need to have ready.
Information you will need:
Step 1: Head to www.blizzcon2014.eventbrite.com, and choose the quantity of tickets you wish to purchase from the drop-down menu. Please remember there is a 4-ticket-per-household limit for General Admission tickets and a 2-ticket-per-household limit for the BlizzCon Benefit Dinner.
Note: Benefit Dinner tickets will not be on sale until May 14.
Step 2: Click “Order Now.” Once you do so, you may find yourself in a “waiting room” before you enter the checkout process. Ticket buyers will be sent from the waiting room to checkout in the order they arrived, and there’s no need to refresh your browser. Keep in mind that being in the waiting room doesn’t necessarily mean you’re guaranteed tickets.
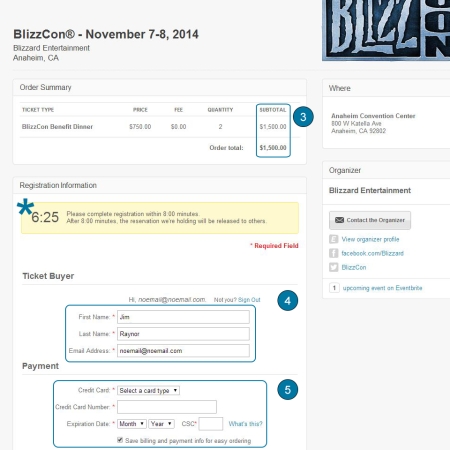
Step 3: Once you’re in the checkout and registration process, ensure the quantity of tickets is correct, and review the subtotal. Keep in mind that you can’t change the quantity of tickets during this process.
You will have 8 minutes to complete your purchase. A countdown will be displayed on-screen so you know how much time you have remaining. After 8 minutes, the tickets will be released for others to buy, drawing from those in the waiting room first.
Step 4: Fill out the Ticket Buyer information (your name and email) to purchase the tickets. All information is required in this step. Make sure you enter a valid email address that you use regularly, as important event communications (including your badges) will be emailed to this address.
Step 5: Enter the credit card information you wish to use for the transaction. Remember, you will need to have this card at the convention if you need to make changes on-site. See the Badge Information web page for more information. (All information is required in this step.)

Step 6: Enter the correct billing information for the credit card you are using to purchase the tickets. (All information is required in this step.)
Step 7: Enter your name and email address for the first ticket (or your friend/family member’s information if you’re purchasing a ticket for someone other than yourself). If you don’t have that information now, just enter your own name and email for nowyou’ll have until June 6 to make changes. (All information is required in this step.)
Step 8: Optionally, enter your character name for your favorite Blizzard game (or the character name of the person you’re assigning this ticket).
Step 9: Check the box to agree to the waiver. If you do not agree, you cannot proceed with purchasing BlizzCon tickets. Remember there is a 4-ticket-per-household limit for General Admission and a 2-ticket-per-household limit for the Benefit Dinner.

Step 10: Enter your friends’ or family members’ name and email address for each additional ticket. Again, you’ll have until June 6 to make changes if you need to sort that out later. (All information is required in this step.)
*If you do not have that information at the time of purchase, use the drop-down menu to auto-fill the ticket with your own name and email addressor, you can manually enter your own information. Remember you need to do this separately for each additional ticket you’re be purchasing.
Step 11: Optionally, enter the character name of the person using this additional ticket. You can leave this blank.
Step 12: You will need to agree to this waiver for each additional ticket you’re purchasing.
Step 13: Once you’ve entered everything, click Pay Now.
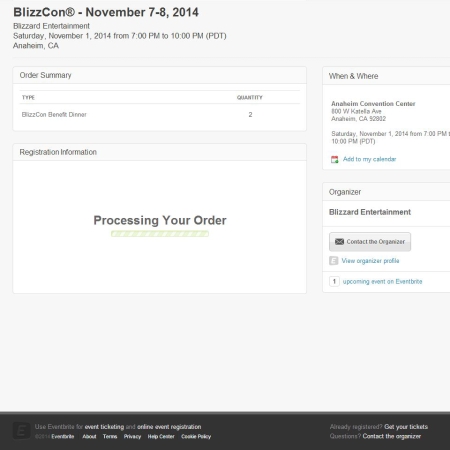
Once you click Pay Now, you will be sent to a processing order page.
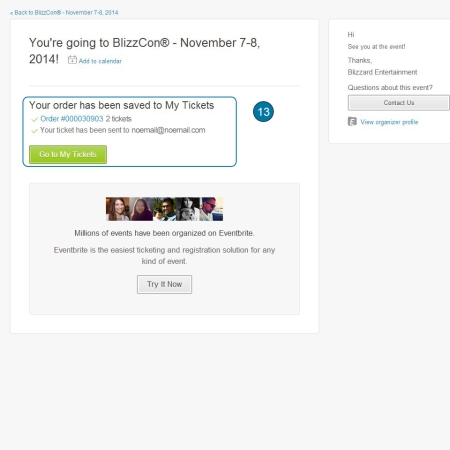
Congratulations! You have successfully purchased tickets to BlizzCon 2014! You will receive a confirmation email (check your spam folder, just in case)!
Information you will need:
- Your information: First Name, Last Name, Email Address, Character name (optional)
- Credit card information, including billing information (Country, Address, City, State, Zip Code)
- Your friends’/family’s information: First Name, Last Name, Email Address, Character Name (optional)
Step 1: Head to www.blizzcon2014.eventbrite.com, and choose the quantity of tickets you wish to purchase from the drop-down menu. Please remember there is a 4-ticket-per-household limit for General Admission tickets and a 2-ticket-per-household limit for the BlizzCon Benefit Dinner.
Note: Benefit Dinner tickets will not be on sale until May 14.
Step 2: Click “Order Now.” Once you do so, you may find yourself in a “waiting room” before you enter the checkout process. Ticket buyers will be sent from the waiting room to checkout in the order they arrived, and there’s no need to refresh your browser. Keep in mind that being in the waiting room doesn’t necessarily mean you’re guaranteed tickets.
Step 3: Once you’re in the checkout and registration process, ensure the quantity of tickets is correct, and review the subtotal. Keep in mind that you can’t change the quantity of tickets during this process.
You will have 8 minutes to complete your purchase. A countdown will be displayed on-screen so you know how much time you have remaining. After 8 minutes, the tickets will be released for others to buy, drawing from those in the waiting room first.
Step 4: Fill out the Ticket Buyer information (your name and email) to purchase the tickets. All information is required in this step. Make sure you enter a valid email address that you use regularly, as important event communications (including your badges) will be emailed to this address.
Step 5: Enter the credit card information you wish to use for the transaction. Remember, you will need to have this card at the convention if you need to make changes on-site. See the Badge Information web page for more information. (All information is required in this step.)
Step 6: Enter the correct billing information for the credit card you are using to purchase the tickets. (All information is required in this step.)
Step 7: Enter your name and email address for the first ticket (or your friend/family member’s information if you’re purchasing a ticket for someone other than yourself). If you don’t have that information now, just enter your own name and email for nowyou’ll have until June 6 to make changes. (All information is required in this step.)
Step 8: Optionally, enter your character name for your favorite Blizzard game (or the character name of the person you’re assigning this ticket).
Step 9: Check the box to agree to the waiver. If you do not agree, you cannot proceed with purchasing BlizzCon tickets. Remember there is a 4-ticket-per-household limit for General Admission and a 2-ticket-per-household limit for the Benefit Dinner.
Step 10: Enter your friends’ or family members’ name and email address for each additional ticket. Again, you’ll have until June 6 to make changes if you need to sort that out later. (All information is required in this step.)
*If you do not have that information at the time of purchase, use the drop-down menu to auto-fill the ticket with your own name and email addressor, you can manually enter your own information. Remember you need to do this separately for each additional ticket you’re be purchasing.
Step 11: Optionally, enter the character name of the person using this additional ticket. You can leave this blank.
Step 12: You will need to agree to this waiver for each additional ticket you’re purchasing.
Step 13: Once you’ve entered everything, click Pay Now.
Once you click Pay Now, you will be sent to a processing order page.
Congratulations! You have successfully purchased tickets to BlizzCon 2014! You will receive a confirmation email (check your spam folder, just in case)!
 Discord